
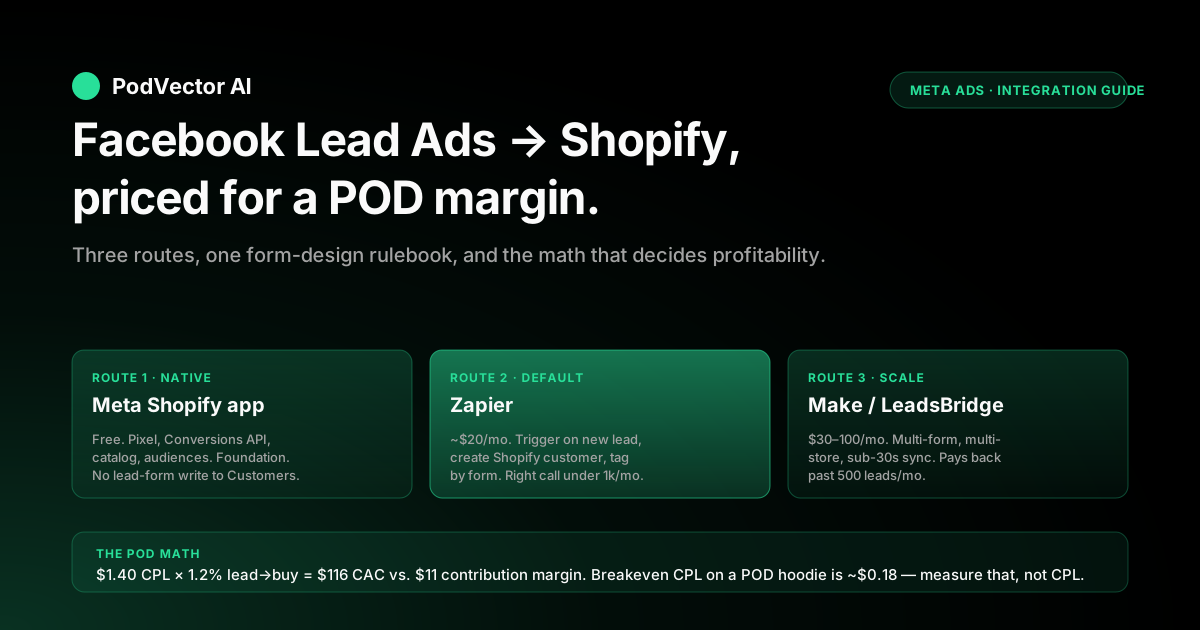
Quick Answer: A Facebook Lead Ads → Shopify integration captures interest inside the Meta feed (no landing page round-trip), syncs the email and consent into Shopify Customers in real time, and tags the source so the welcome flow can convert that lead into a first POD order. The native Facebook & Instagram Shopify app handles audience and pixel sync but does not push lead-form submissions into Shopify Customers — that requires Zapier, Make, LeadsBridge, or a dedicated CRM connector.
The footnote nobody writes for POD operators: cost-per-lead is meaningless without cost-per-customer-net-of-base-cost. A $1.40 CPL on a list that converts at 1.2% to a $32 hoodie with $19 base cost yields a $116 effective CPA against $13 contribution margin — the integration works, the ad campaign loses money. This piece is the integration playbook with the POD margin reality kept in frame.
Why this integration matters for a POD store
Facebook Lead Ads keep the form inside the Meta feed. The user taps the ad, the form pre-fills with the email address Meta already has on file, the user submits in two taps, and the ad never costs the operator a landing-page round-trip or a Shopify checkout-flow drop.
For a POD catalog where the product is built around a niche identity — dog dads, sober runners, plant parents, vintage-motorcycle restorers — that frictionless form is the cheapest way to build a list of people who self-identify into the niche. Email opt-ins from Lead Ads typically run $1–3 in CPL on POD niches, against $4–9 for the same opt-in routed through a landing-page lead magnet.
The catch is that Meta does not deposit those leads anywhere useful by default. Lead-form submissions sit inside the Meta Ads Manager export — a CSV the operator has to manually download, dedupe, and import.
The integration in this guide is the bridge that takes the form submission and writes it into Shopify Customers as a tagged record, so the welcome email fires within minutes and the lead enters the same lifecycle as any other Shopify customer. The Extuitive guide covers the fundamentals at extuitive.com/articles/facebook-lead-ads-shopify-integration; the Promodo step-by-step at promodo.com/blog/how-to-connect-facebook-leads-to-shopify is the closest existing playbook. Both miss the POD margin layer that decides whether the integration is profitable.
For the broader Meta Ads context, the Meta Ads for POD topic hub is the entry point, the Meta ad types cluster is where this piece sits, and the complete guide to Meta ad types for POD sellers is the cluster pillar that frames how Lead Ads slot into a full Meta campaign mix.
What you need before you start
Five prerequisites. Skip any of them and the integration either fails outright or quietly leaks data:
- A paid Shopify plan. Basic, Shopify, or Advanced — any of them works. Trial stores cannot fire conversion events to Meta because the password gate blocks the pixel. Shopify Plus is overkill unless you are routing leads through Shopify Flow at high volume.
- A Facebook Page tied to a Meta Business Manager. Lead Ads run on a Page; the Business Manager owns the ad account and permissions. If the operator has been running ads from a personal account, this is the moment to migrate.
- The Meta Pixel installed on the Shopify store and firing correctly. The Lead Ads form does not need the pixel, but the audiences you build from those leads do. Verify firing with the Meta Pixel Helper Chrome extension before launching anything.
- An email service provider connected to Shopify. Klaviyo, Omnisend, Shopify Email, or Mailchimp. The lead arrives in Shopify Customers; the welcome flow lives in the ESP. Without the welcome flow, the integration is a list-builder that never converts.
- A consent-checked lead form. Meta's lead form supports an optional custom-disclaimer checkbox; for any list you intend to email, that checkbox is non-optional in the EU and a strong-preferred in the US for spam-rate management.
Once those are in place, the integration is a 30–45 minute setup. The variable is which route — and the route depends on lead volume and budget tolerance.
The three integration routes (and which one fits POD)
Three commonly recommended routes, ranked from native-but-limited to flexible-but-paid:
- Facebook & Instagram by Meta Shopify app (free). Syncs catalog, audiences, and pixel events between Shopify and Meta. Does not sync lead-form submissions into Shopify Customers. Useful, necessary, but not sufficient on its own.
- Zapier (~$20–50/month at typical POD volume). Triggers on a new Lead Ads submission, creates the Shopify customer, applies a tag. The default route for stores doing under 1,000 leads per month — which is most POD stores.
- LeadsBridge, Make, or a dedicated CRM connector ($30–100/month). Higher volume, more transformation logic, real-time at scale. Worth it once the store is generating 500+ leads per month or running multi-form campaigns where Zapier's per-task pricing starts to bite.
For a POD operator running a single store at $20–50/day in Lead Ads spend, Zapier is the right default. For a multi-niche POD operation running parallel forms across audiences, LeadsBridge or Make pays back. SaveMyLeads' Shopify connector at savemyleads.com/facebook-lead-ads/shopify is the closest free-tier option but ships with a "coming soon" caveat in places, so verify availability for your account before committing.
Setup, route 1: Facebook & Instagram by Meta app
This is the foundation layer regardless of which sync tool you use on top. Install it first.
- Install the app. Shopify admin → Apps → search "Facebook & Instagram by Meta" → Install. Authorize the connection to the Page and the Business Manager.
- Connect the Meta Pixel. Inside the app's Settings, select an existing pixel or create a new one. The app automatically wires the Conversions API on the Shopify side — important because iOS 14.5+ broke browser-side pixel firing for many users. Verify by opening Shopify in a private window, adding a product to cart, and checking the Events Manager test tab in Meta.
- Sync the product catalog. The app pushes Shopify products to a Meta catalog automatically. POD-specific note: the catalog is what powers Dynamic Product Ads — a separate format we cover in detail in the Facebook Dynamic Product Ads Shopify strategy piece. For Lead Ads specifically the catalog is not required, but having it in place means lead-source audiences can later feed retargeting through Dynamic ads without re-doing setup.
- Configure customer audience syncing. Inside the app's audience settings, enable the customer-list sync. This sends Shopify customer email hashes to Meta on a 24-hour cycle, which is the substrate for lookalike audiences off the lead-converted segment of your list.
- Enable Lead Ads on the Page. Page → Settings → Lead Ads Forms → grant access to the Business Manager admin email and the Ads Manager. Without this step, Lead Ads run but the form data is locked behind manual CSV download.
What the native app does not do: it does not write Lead Ads form submissions into Shopify Customers. That is the gap the second-route tool fills.
Setup, route 2: Zapier (the practical default)
The Zapier setup takes 15 minutes and runs at a few cents per lead at typical POD volume. Six steps:
- Create a Zapier account if you do not have one. The Starter plan ($19.99/month at typical 2026 pricing) covers most POD stores at under 750 tasks per month.
- Trigger: Facebook Lead Ads → New Lead. Connect the Lead Ads account, select the Page, select the specific lead form. If the form does not appear in the dropdown, the Page is missing the Lead Ads admin grant from step 5 of the native-app setup — fix that and re-authorize the connection.
- Action: Shopify → Create Customer. Connect the Shopify store, then map the form fields: Email → Email, First Name → First Name, Last Name → Last Name (or Full Name → split with a Zapier Formatter step if your form returns a single name field), Phone → Phone if collected. Set
Accepts Marketingbased on whether the form's consent checkbox was ticked — this is critical for compliance and ESP routing. - Set the customer tag. In the Shopify Create Customer step, populate the
Tagsfield with at leastfacebook-leadand ideally a campaign-specific tag likefacebook-lead-{form-name}. The tag is what the welcome flow filters on; without it, Lead Ads leads commingle with checkout customers and the welcome email is wrong for both segments. - Test the Zap with a real submission. Either submit your own form (free, takes 30 seconds, leaves a real test lead in Ads Manager) or use Meta's Lead Ads Testing Tool at the Page level. Verify the customer appears in Shopify with the right tag, the right consent flag, and the right name fields.
- Turn the Zap on. Monitor task usage for the first week — the Starter plan caps at 750 tasks/month, and a single high-spending form day on a hot ad creative can spike to 200+ leads/day on a popular niche.
One configuration detail that breaks more setups than any other: Zapier's Facebook Lead Ads trigger only runs on new leads after the Zap is turned on. Submissions that arrived before activation never replay.
The fix on launch day is to manually export the historical CSV from Ads Manager, format it to match Shopify's customer-import schema, and upload via the Customers admin page. From the Zap-activation moment forward, the integration is automatic.
Setup, route 3: LeadsBridge or Make for higher volume
The case for stepping up to LeadsBridge (leadsbridge.com/integrations/facebook-lead-ads/shopify) or Make (make.com/en/integrations/facebook-lead-ads/shopify) is volume and transformation logic. Both platforms run at lower per-task cost than Zapier above ~750 leads/month, both expose multi-step branching, and Make's visual scenario builder is the most flexible of the three for routing leads conditionally — by form, by audience, by region — into different Shopify tags or even different Shopify stores.
The configuration is conceptually identical to Zapier: trigger on a new Lead Ads submission, create or update a Shopify customer, apply tags, route to the ESP. The differences are in transformation depth (Make wins), real-time latency (LeadsBridge advertises sub-30-second sync), and pricing model (LeadsBridge is per-lead at scale; Make is per-operation, which is cheaper for simple flows).
For a POD operator running a single store under 500 leads/month, the upgrade is unnecessary — Zapier is fine. For an operator running multi-niche stores at $200–500/day in Lead Ads spend across multiple Pages, the consolidation into Make or LeadsBridge usually saves 30–50% on per-lead sync cost and removes the Zapier task-cap variable from the budget.
Lead form design for POD
The integration is plumbing. The form is the lever. Five rules that separate Lead Ads forms that build POD lists from forms that just collect cheap unconverting emails:
- Ask for the email and one identity field, nothing more. Every additional field drops form completion 5–8%. Phone numbers feel valuable but POD checkout flows do not need them, and a phone field on the form prices the lead 30–50% higher with no measurable lift in eventual purchase rate. Email plus first name is the right floor.
- Use the "Higher Intent" form template, not "More Volume." Meta's two form templates trade volume for intent. Higher Intent adds a review screen before submit, which trims completions ~15% but more than makes up for it in welcome-flow open rate and eventual purchase rate. The form completions you lose were the ones not going to convert anyway.
- Match the form's promise to the ad's promise. If the ad creative offers "$10 off your first vintage motorcycle hoodie," the form's intro screen says exactly that, and the welcome email delivers the discount within five minutes. Mismatches between ad creative, form copy, and welcome email lose 30–50% of leads at the first email open.
- Add the consent checkbox even where it is optional. Lower opt-in rate, dramatically lower spam-flag rate. The leads that tick the box are the leads that read emails. The leads that would have unticked the box if given the choice are the ones who hit "report spam" anyway.
- Tie the form name to the ad set. Multiple forms with names like "MotorcycleHoodie-Spring2026" and "DogDadMug-Spring2026" let the integration tag leads by source. One generic "store" form across all campaigns destroys downstream attribution.
What to do with leads after they hit Shopify
The integration deposits the lead. The conversion is what happens next. The default flow, sequenced for a POD store:
- Welcome email at 0 minutes. Triggered by the
facebook-leadtag in Klaviyo or Omnisend. Subject line names the niche (not the store). Body delivers the discount or content promised in the ad. CTA: shop the niche-specific collection. Open rate target: 45–60%, click rate 8–14%. - Niche-anchor email at 24 hours. Story-led email about why the niche exists in the catalog — the operator's relationship to the niche, the specific designs and why. POD apparel sells on identity, not utility, and the niche-anchor email is what locks the identity association before the discount expires.
- Discount-expiring reminder at 48 hours. Same offer as email 1, framed as expiring. Conversion rate on this email is usually 1.5–2.5× email 1's because urgency closes the deferred decisions.
- Best-sellers email at 7 days. If the lead has not bought, switch from discount to social proof. Top three sellers in the niche, customer photo gallery, review excerpts. Do not re-discount — operators who keep extending the welcome discount train the list to wait.
- Lifecycle handoff at 14 days. Move the contact out of the welcome flow into the standard newsletter cadence. Re-engage with new product launches and seasonal moments. The first-purchase decision usually lands in days 3–10; if it has not landed by day 14, the standard cadence is the right home.
For the retargeting layer that runs in parallel — leads who visited the store but did not purchase, and customers who bought but should re-buy — see the Facebook retargeting ads for Shopify strategy piece.
Measuring what actually matters: profit-per-lead
The metrics every Lead Ads dashboard surfaces by default — cost-per-lead, lead form completion rate, lead quality score — measure the top of the funnel. A POD operator measuring only those metrics scales whichever forms produce the cheapest leads, which is usually whichever forms attract the lowest-intent traffic. The metric that matters is profit-per-lead, computed across the lead → first purchase → repeat purchase arc.
The math, walked: a $32 hoodie at $19 Printify base cost, $0.85 Shopify payment processing, and a 6% return rate yields about $11.30 contribution margin per net order. If the lead-to-first-purchase conversion rate is 1.2% (typical for cold POD niches; warm-list niches run 3–5%), the effective customer-acquisition cost per first purchase is CPL ÷ 0.012 = 83× CPL.
At $1.40 CPL the effective CAC is $116, against $11.30 contribution margin — a 0.10x first-order ROAS. The campaign loses money on first order by a factor of ten.
The campaign becomes profitable only on repeat-purchase contribution. If 30% of first-time buyers buy a second time within 90 days at a similar contribution margin, lifetime contribution per converting lead is $11.30 × 1.30 = $14.69, and the breakeven CPL is $14.69 × 0.012 = $0.18.
CPLs above $0.18 lose money on a 90-day window. CPLs below $0.18 print money. Most POD operators running Lead Ads sit at $0.80–$2.50 CPL and cannot tell you which side of $0.18 they are on because nobody is computing the math weekly.
This is the core attribution problem the broader Meta Ads stack exists to solve, and the POD-specific configuration is laid out in the complete guide to Meta Ads ROAS and attribution for POD. The Shopify-side instrumentation is in the complete guide to Meta Ads + Shopify integration for POD.
Common pitfalls (and the POD-specific ones)
The pitfalls every Lead Ads guide warns about — broken pixel, no welcome flow, untagged customers, no consent checkbox — are real, and the steps above prevent them. Three pitfalls specific to POD that none of the Extuitive, Promodo, or SaveMyLeads guides cover:
- Lead-source audiences quietly cannibalize Performance 5 audiences. The Lookalike audience built off Lead Ads converters overlaps heavily with the Lookalike built off Shopify purchasers. Running both as separate ad sets means Meta's auction bids against itself. Either consolidate into Advantage+ Audience or explicitly exclude the lead-converter Lookalike from the purchaser-Lookalike ad set.
- Niche identity drift in the welcome flow. POD niches like "minimalist plant parent" or "vintage motorcycle restorer" depend on aesthetic consistency. A welcome email built off a generic Shopify template breaks the identity association the Lead Ads creative built — and conversion drops 30–50%. The welcome flow has to look and read like the ad it caught the lead from.
- Refunds never feed back into the ad-spend math. POD apparel returns at 4–8% versus the 2–3% ecommerce baseline. If those refunds are not posted back as offline conversions to Meta and not subtracted from the lead-to-purchase contribution figure, the operator overestimates the campaign's profitability by 10–25% and overbids against bad audiences. The fix is operationally annoying — most stores skip it — and it is the single biggest reason Lead Ads campaigns appear to work and silently lose money.
FAQs
Why are my Facebook leads not syncing to Shopify in real time?
Three causes account for most cases: the Zap or connector is paused (check the dashboard); the Page does not have Lead Ads admin granted to the Business Manager (Page Settings → Lead Ads Forms); or the Zap was created and turned off without a successful test run. Re-test with a manual form submission and watch the connector's run log for the failure point.
Can I automatically tag Shopify customers based on which Facebook ad they came from?
Yes — both Zapier and Make support multi-step Zaps where the Lead Ads "form name" or a hidden form field becomes a Shopify customer tag. Name your forms by ad set or audience (e.g. MotorcycleHoodie-LookalikePurchaser-Spring2026), map that form name into the Shopify tag field, and the tag arrives with the customer record. The tag is what your ESP filters on for source-specific welcome flows.
Do I need the Facebook & Instagram by Meta Shopify app if I am using Zapier?
Yes. The native app handles pixel firing, Conversions API, catalog sync, and customer audience sync — none of which Zapier handles. The two integrations are complementary: native app for events and audiences, Zapier for the lead-form data write into Shopify Customers.
What is the most reliable way to connect Facebook Leads if I have over 1,000 leads per day?
Make or LeadsBridge over Zapier. Zapier's task-pricing penalizes high volume, and its trigger polling has a built-in latency that becomes noticeable at lead-per-minute rates.
Make's visual scenario builder runs at lower per-operation cost; LeadsBridge advertises sub-30-second sync at scale. For a single-store POD operation that is hitting 1,000+ leads/day, the campaign is also probably ready for a dedicated CRM (Klaviyo's audience sync, ActiveCampaign, HubSpot) rather than treating Shopify Customers as the primary list store.
How can I test the integration without spending on live ads?
Use Meta's Lead Ads Testing Tool inside Ads Manager — it lets you submit your own test form data without burning ad spend, and the submission flows through the same connector pipeline a real lead would. The test record arrives in Shopify Customers, lets you verify tags and consent flags, and is easy to delete. This is the right way to confirm the integration before launch day.
Should I run Lead Ads or send the traffic to a Shopify landing page instead?
Depends on the goal. If the goal is list-building cheap and fast, Lead Ads win on CPL by a factor of 2–4× and the form completion rate inside Meta is 8–12% versus 1–3% on a landing-page squeeze. If the goal is first-purchase conversion in the same session, a Shopify landing page with the discount pre-applied wins because the user is already inside the checkout flow. Most POD operators run both: Lead Ads for cold list-building, landing-page traffic for high-intent ad sets, and the data tells you which audience leans which way.
Why is my CPL low but my revenue from the list is flat?
Low CPL with flat list revenue means the form is attracting clickers, not buyers. Three usual culprits: the lead form is "More Volume" template instead of "Higher Intent," so the form completion does not require any commitment beyond a tap; the welcome flow is generic Shopify branding instead of niche-specific, so the identity association from the ad evaporates on first email open; or the discount in the welcome email is too small (under 10%) to motivate a first POD purchase from a cold lead. Fix the highest-leverage of those three and CPL stays low while list-derived revenue starts moving.
Does this integration affect my Meta ad attribution?
Indirectly. The native pixel + Conversions API setup is what feeds purchase events back to Meta — Lead Ads conversions on their own do not signal purchase intent until the lead returns and buys.
Posting Shopify purchase events back to Meta with a deterministic ID match (email-hash or external-ID) is what closes the loop. The full Conversions API setup for a POD store is in the complete guide to Meta Ads + Shopify integration for POD, and the cross-platform attribution math is in the Meta Ads ROAS and attribution guide.
The shortest path to "is this Lead Ads campaign actually profitable?"
The integration above is the easy part — 30 minutes of setup. The hard part is knowing, two weeks in, whether the leads you are paying for are turning into customers whose contribution margin clears the CPL after Printify or Printful base cost, Shopify fees, returns, and shipping. Spreadsheet-stacking that math across Meta Ads Manager, Shopify, and your POD provider is what most operators give up on by month two. That is exactly where Victor comes in. Victor is the AI employee built specifically for POD sellers. He sees your Shopify orders, your Printify or Printful costs, and your Meta Ads data together, so he can tell you "which Lead Ads forms are profitable, net of base cost, fees, shipping, and refunds, broken down by audience and tag" in seconds. Victor answers your questions and acts on them — with your approval. And see your Lead Ads campaigns turned into one number.
Try Victor free